Saturday, 28 September 2013

Lunch Time

Much to my surprise I decided that I didn't want to go plan Jane and chose a two tone background paper which would go great with this theme - the incredibles! We had been invited out to lunch at my uncles farm and Ethan didn't want to eat his lunch when everyone else was eating but much later he finally realised he was actually getting hungry.... He took his chair sat under the tree away from everyone and had me bring him his lunch! A man that knows what he wants - piece and quiet after a busy morning chasing the hens, ducks, dog and what not on the farm!!
With this page I did a little tracing over the pictures of the main character, I knew  the red of the back paper would come through the tracing paper bring in colour to his uniform. I painted the black on his mask, gloves and pants. The boarder I backed as with the leafs to lift and then put foam tape to bring it off the page. The heading(Lunch Time) I split half on one page but still backing it to enhance it on the page.
 
 
On the second layout I did journaling on a tag and the used twine in place of ribbon to match with the theme of garden. I stamped with white ink on black board in the left corner and used white heat embossing. The lemon is a sticker which I placed on a card stock and then cut another circle to add the effect of an additional  lemon by the glass.
I did enjoy this page purely because Ethan was relaxing and getting his second wind before he ran around collecting nuts which we needed to pull out his pockets when he fell a sleep in the car going home.... You've  got to love the journey you go on with your boys!!
 
 
Enjoy XXOO

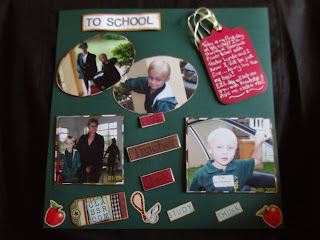
Ethan's off to "big School"

Starting with a basic colours and then getting a pattern page to match your photo's was always the challenge for me!!! Sue - my teacher started with basic two pages, plain colours and then always brought in the pattern paper to match our pictures ... Yes, I would feel like my head wanted to explode or more like implode when I got to stand in front of all those AMAZING pattern papers! I just wanted to have them all!!!! But NEVER... No, never cut them perhaps roll around on them (in your dreams)naked and then the amazing colours would just magically stick to my body and I would just be that beautiful, colourful & fabulous!!! Refocusing, Sue then showed me the art of choosing the paper - pick a colour out in the photo whether it was a green, orange or red and focus on that as your colours for the page with the pattern paper. Also remember always back your embellishments it will lift them, and they don't blend with the background.
 
 
Here I did a boarder on the left with crayons but due to them being bold in colour I decided to go against what I have just said and didn't back these embellishments. Then used a pre-made frame to place a photo in as it is the only one with both the boy in! The heading has got double sided foam tape to lift it off the page giving it height. I placed ribbon through the tag -"watch out!"


To show the difference from home to school I shaped the picture differently. Once again every photo is backed yet it is backed on different pattern papers to enhance different elements on the photo.
Had fun doing these pictures as I know my babies are growing fast and I can enjoy them at an age where they want to kiss me at the school gate...
Enjoy XXOO

Saturday, 21 September 2013

Kindergarden


Simplistic elements.... I backed the photo's then using foam stamps I stamped the heading with cream acrylic paints. On the ends of the pages I placed borders. I placed a small picture of Ethan on the "school days" clip board embellishment


I tore around the edges of the picture backing of the black and white photo of Ethan
The class photo got a "tail" which was chalked with dark brown.


Placed journaling on both pages as they where photo's over 3 years I knew that it would always be a fond memory to look back on and see the small difference's in the years. Ethan loved his years at kinder garden and so often he remembers his teacher and her kind heart and gentle nature! Renate will always be a gem in his eye's!
Thank you for the years you have given him and your time and dedication! 
 

All Boy

On these pages we brought in a large variety of colours using strips of paper blending the different colours to enhance the pictures. Each strip has a unique colour palette of it's own as well being different in size adding WOW factor to the page! The circles varying in size also draw you to the centre of the page bring your focus to the photo. Simple pages but effective! Adding small elements of 'boy' embellishments to bring out characteristics of Ethan!


These images are really special as Ethan was a very sick little baby yet a very happy child. many friends couldn't believe when they would look at this happy boy that he was a sick boy that every 6 week in his life he would be in hospital. after his 1st Birthday they operated and it was as if they flipped the switch in this little mans life and he got healthier by month and for that we have always be very blessed for. over the years he has grown from strength to strength.
Thank you for taking time to enjoy. xxoo

Sunday, 15 September 2013

Christmas Music Decoration

This was done with a music book torn and rolled into cones. Each cone was edged with dark brown chalk glued in place on a round board with a centre piece that was glitter heat embossed in red for your Xmas colours and then to bring in Joy for the your embellishment. I used red satin ribbon to match with the red Glitter in my centre piece.


I am entering this into the latest monthly challenge over at Creative Craft Cottage which is 'Round Like A Record'.

Loved doing this wreath, so I decided to do another for Gill, the teacher at the school as she loves her books. Great Christmas gift for a teacher - cost effective and something she will love as not only can I get Ethan involved but it is quick and easy and every Christmas she'll have a wreath made of what she loves...Books! 

So first I took a piece of hard board and used my large dinner plate and drew around it (25cm diameter) that was my base then punched a hole for the ribbon about 2cm from the top. Took satin red ribbon and made a knot through the hole.Then I divided the circle in four with pen or pencil as it is going to be covered with the cones. Know we want our enter piece. I went with 7.5cm in diameter and did 2 circles. 1 will be my base and the top one I did fine heat embossing on in red glitter. then I added a felt "Joy" sign and with liquid pearls I added candy canes at the top and the bottom. on the "Joy" I put gold glitter stickles. I used double layers of foam tape to lift my centre piece.

Took and old book from the second hand store that cost me 50c and tore the pages out and inked one side.


Once you have inked the pages( you will need at least 50 - 60) you will begin to roll.
First you will place the page in front of you then take your double-sided tape place it in the right hand corners to hold it down. if you are unsure test your cone roll first before rolling. Put long piece on the bottom right side to hold it firm once rolled. of you want to make sure they are all the same size use a "glossy accents" bottle at the top of your cone before taping for consistency.


As you can see in the picture when I chose pictures from the book I also tore drawings from the book to bring dimensions and character to the wreath due to it being from a story book.
When you stick the cones down start on one of the lines you have drawn and work with a firm glue and remember to glue the side of your cones as well - both sides so as to hold firm.
below you can see how I worked opposites to firstly balance with both the pictures and with sizes as I don't roll my cones with procession. I do how ever have loads of fun when I do the wreath as Ethan tears the pages out the book he does my chalking on the edges and yes he even does the heat embossing!!   


I think give the boys half a chance they would love to all my heat embossing...Ethan enjoys watching it change from the powder to the perfect image!! It's his giggle that I enjoy - I just have to smile every time!!
Great that at 11 he still wants to help make the gifts for his teachers...

hope you can go know and make a wreath of your own.
let me know what you think and don't hesitate to ask if you have any questions..

Hope you visit again soon
Love and Kisses
xxoo

Saturday, 14 September 2013

Mud Buddies

So often when you going to classes you hoping to keep learning new techniques. My biggest concern was every time I googled images all I found was the most amazing scrapped pages of girls and the layouts where detailed and I could feel my head wanting to just explode! This didn't help me as I have 2 wonderful boys at I all I wanted to do was scrap them. Yet I couldn't and hadn't yet learn't to bring in the amazing palette of colours in to my layouts. Often the Webb sites wouldn't give you details like the sites do today on how to achieve the look you are after. 


As my classes progressed  I got to understand that small details make a big difference on your page. We then began making pockets which was challenging, and then to bring in other textures on to ones page's such as cork or denim! Knowing what glue to use as double sided tape doesn't work with everything was interesting for me as standard glue for paper just wasn't going to work!!! So we needed som fancy pants glue that was going to be strong and going to bond all tough textures to paper...Mono liquid glue gets the job done!! Something else I learnt and is a great technique and do still love using today is when you tear/torn or distress the edges of your paper then you chalk it with the colour of it your page, I invariably stuck with a dark brown.


Cutting out letters became a task all on it's own which I just knew I couldn't deal with and had to find an alternative.... From buying foam letters to getting a mixture of sticker letters to wooden alphabet's but even then I still wanted more! That was when I got introduced to the Cuttlebug! A delightful alternative as I could use my own papers and then discovered that not only could you get letters but a large number of shapes, pictures which opened a whole world of possibilities when doing ones pages! 

Monday, 9 September 2013

A Journey

As I continued with my classes I began to understand just how talented both Sue and classes room friends just where! Spending our time crafting away with the amazing papers that where placed in front of us and at this point I couldn't get myself to cut them! So I was always getting one extra just to marvel at, and ending up building up a collection of pattern papers! Yes you could say I've lost my marble's...but as someone who is still new in the this field I found it hard to start mastering the art of selecting the paper to match the photo and I knew it would take time! Just love the passion and the pleasure of derived from scrapping memories....Thank you for this art form!